Flow.42 Analytics: Interpretation Guide Version: 2026-07-11 · Evidenced on two live cases, MNQ 09-26, 2026-07-10
The core insight in two sentences: An S/R level from VolImbalance tells you that a large participant stood there. An absorption diamond from AbsorptionMap tells you whether he won or lost.
The second, equally important insight: Absorption tells you where, not when. It is a context signal, not an entry trigger.
1. Why this guide exists
An ASK cluster is red and means "resistance". A green absorption diamond means "bullish". When both appear at the same price, in the same minute, it looks like a contradiction, and the obvious reaction ("red line = short") is then exactly wrong.
They do not contradict each other. They describe two halves of the same event.
2. What the two indicators actually measure (code semantics)
VolImbalance: where was the order?
| Type | Meaning | Color | Level |
|---|---|---|---|
AskImbalance |
bearish, ask side → selling dominance | Red | Resistance |
BidImbalance |
bullish, bid side → buying dominance | Green | Support |
A cluster ([5x] 649) = several stacked imbalances of the same type, here 5,
totalling 649 contracts. The level is drawn because size demonstrably
traded there.
AbsorptionMap: did that order work?
| Marker | Code | Meaning | Context |
|---|---|---|---|
| 🟢 Green diamond | AskAbsorbedColor = LimeGreen |
"selling absorbed": aggressive selling was soaked up | bullish |
| 🔴 Orange/red diamond | BidAbsorbedColor = OrangeRed |
"buying absorbed": aggressive buying was soaked up | bearish |
The diamond appears only when the aggressive side failed: volume was pushed through, and price still did not move. Large ringed diamonds = strong/confirmed absorption; small pale ones = provisional candidates.
3. The core insight
A level exists because a seller (or buyer) stood there. A diamond exists because that very participant failed.
When both sit on top of each other:
The seller is real, but he is being eaten.
The level is then not a place to fade. It is a target that will break.
4. The four constellations (2×2 matrix)
| VolImbalance cluster | AbsorptionMap diamond | Reading | Consequence |
|---|---|---|---|
| ASK (resistance, red) | 🟢 green: selling absorbed | TRAPPED SELLER | Level breaks up. Do not short. The break is the long trigger. |
| ASK (resistance, red) | 🔴 red: buying absorbed | Resistance confirmed | Buyers failed against the seller → level holds. Fading is valid. |
| BID (support, green) | 🔴 red: buying absorbed | TRAPPED BUYER | Level breaks down. Do not go long. The break is the short trigger. |
| BID (support, green) | 🟢 green: selling absorbed | Support confirmed | Sellers failed against the buyer → level holds. Longing is valid. |
Rule of thumb: - Same color for cluster and diamond (red+red / green+green) → the level holds. - Opposite color (red cluster + green diamond, green cluster + red diamond) → the level is a trap and will break.
5. ⚠️ Absorption is context, not a trigger
This is the part that costs money if you have not internalised it.
The diamond says: "the aggressive side failed HERE." It does not say: "the reversal starts NOW."
Between the absorption and the resolution the market can keep moving against you, in Case B below by 18 points, even though the absorption was correct and the later break was correct too. The seller won the moment and still lost the round.
Practical consequence:
| The diamond | puts you on alert. Discard the fade idea. Note the direction. |
| The break of the level | is the entry. Only a close beyond PriceMax + Deviation confirms the trapped trade is working. |
This is exactly why the Deviation setting is not cosmetic: it is your trade trigger (see chapter 10).
If you do enter on the diamond, size the stop to survive an adverse excursion on the order of Case B (≈18 MNQ points).
6. After the break: polarity flip
A broken trapped level flips into the opposite role:
- Broken resistance (trapped seller) → becomes support. The covering seller and the new longs defend it.
- Broken support (trapped buyer) → becomes resistance.
The retest from the other side is often the better entry than the break itself.
7. Case study A: the clean case (19:29 / 19:30)
MNQ 09-26, 2026-07-10
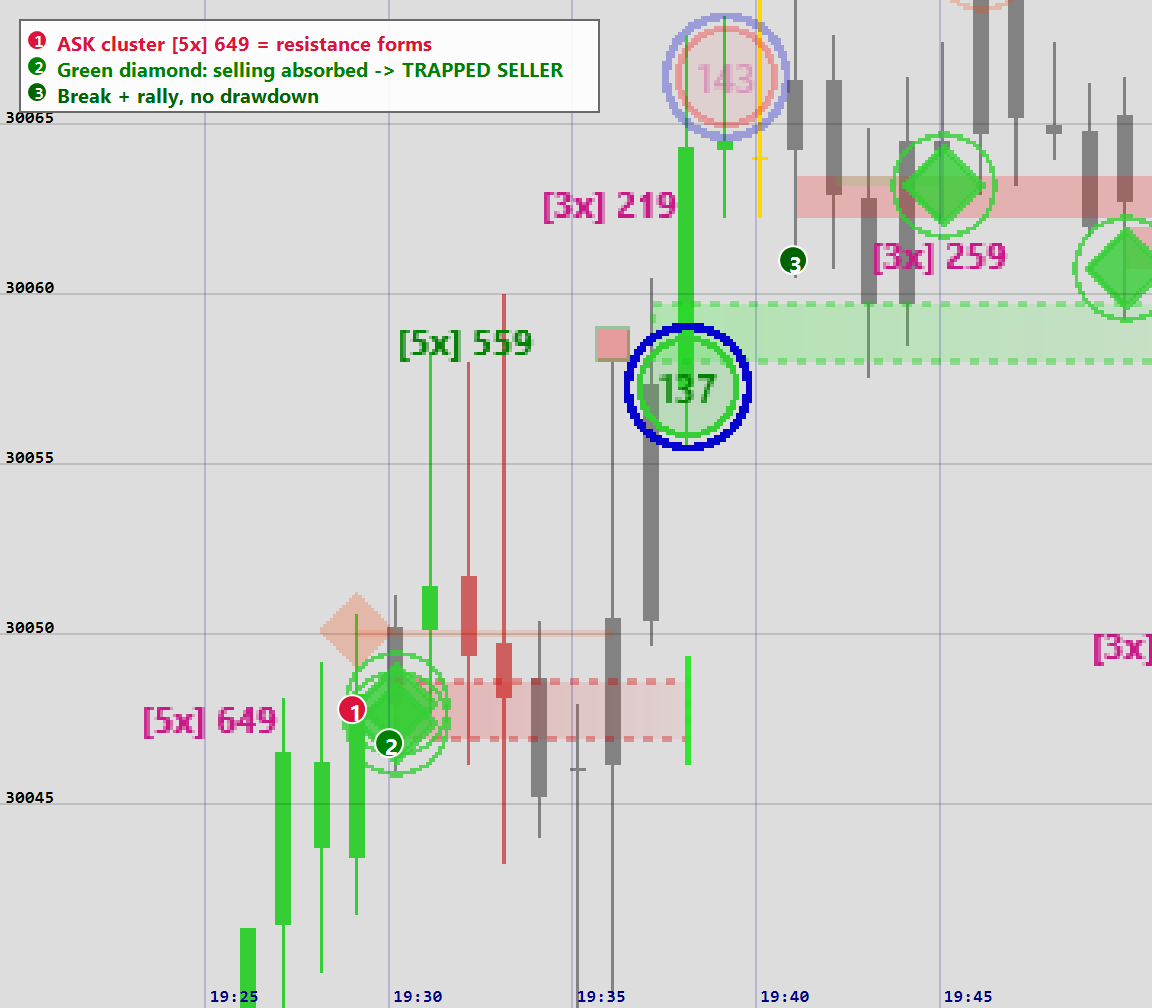
19:29: ASK cluster [5x] 649 at roughly 30046.9 to 30048.75. Five
stacked ask imbalances, 649 contracts. A large seller, clearly visible.
Resistance is drawn.
19:30: 🟢 Large ringed green diamond, right inside the zone. Selling absorbed. The aggressive selling was soaked up by passive buyers. Price does not fall.
Reading: Trapped seller. The red line is a target, not a short.
Resolution: Price runs up without a detour, from ~30047 to above
30065 by 19:42. No drawdown, no hesitation. The [5x] 649 band is drawn dashed
and truncated at the break point = invalidated.
This is the textbook form: big trapped seller, immediate absorption, direct break.
8. Case study B: the honest case (19:56)
Same chart, 27 minutes later. Same signal, different path.
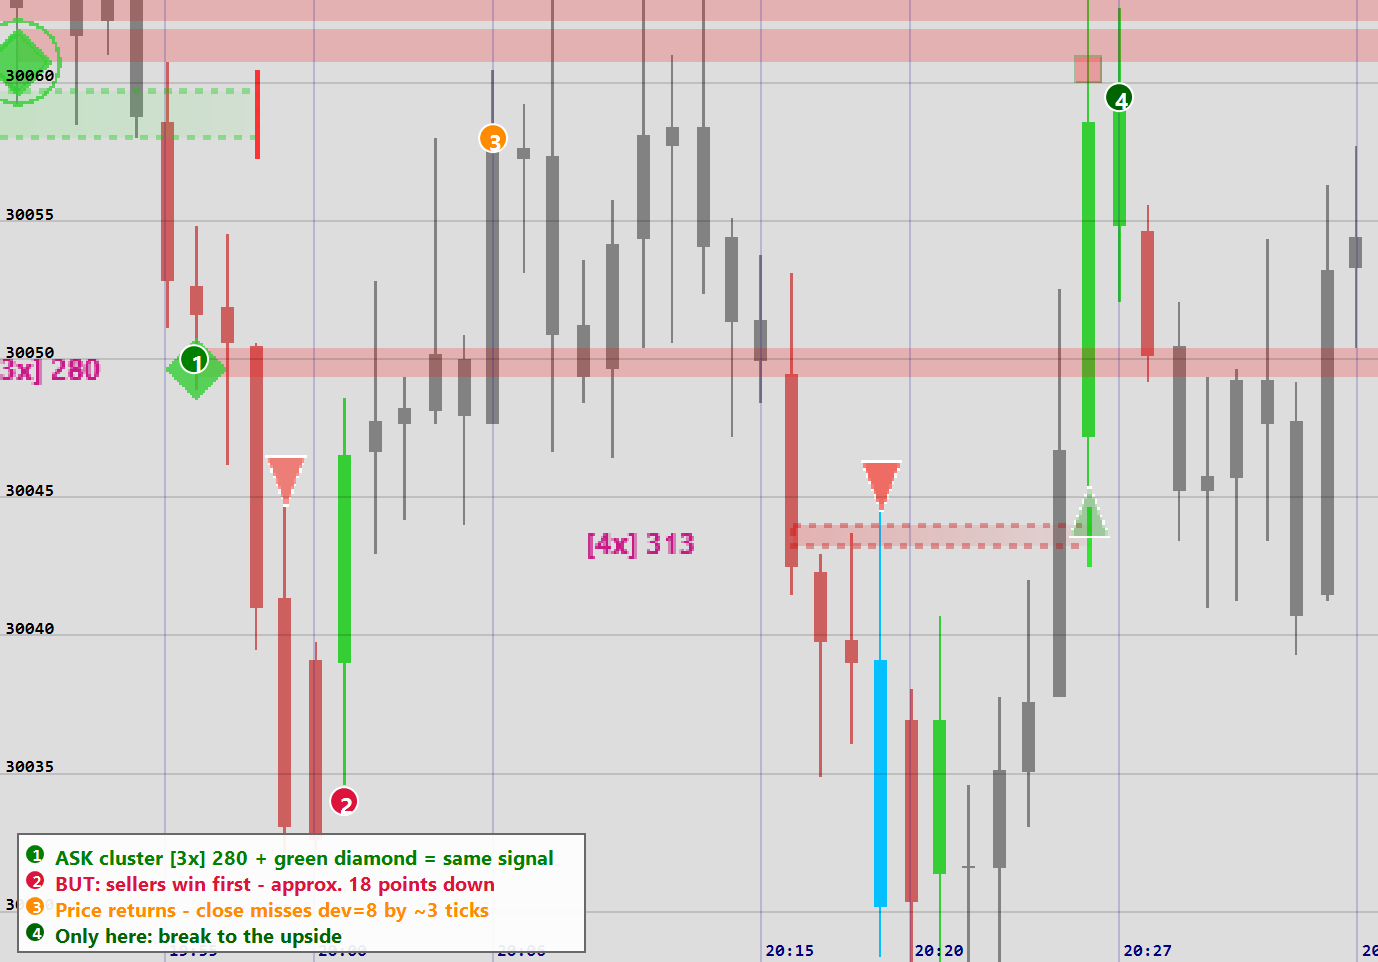
19:56: ASK cluster [3x] 280 at 30049.25 to 30050.75, with a 🟢
green diamond right on it. At first glance exactly the same constellation as
Case A.
But then: price first drops ~18 points, from ~30049 to ~30031. The sellers won the moment. Anyone who went long on the diamond was underwater.
And only then: price returns, pushes above the zone from ~20:05 and finally breaks it with a green impulse. The level has held as support since.
This is the real-world form: the signal was right, but not immediately. Absorption shifts the odds; it does not guarantee timing.
9. What separates Case A from Case B
Same pattern twice, two very different paths. Observable differences (indications, not law):
| Case A (19:29): clean | Case B (19:56): delayed | |
|---|---|---|
| Trapped size | [5x] 649: 5 imbalances, 649 contracts |
[3x] 280: 3 imbalances, 280 contracts |
| Position in the move | Price pushes into the level from below, advance under way | Price sits at the day's high after an extended run, first rollover |
| Outcome | Direct break, no drawdown | −18 points, then break |
Rules of thumb: - The larger the trapped seller, the more fuel the squeeze has (he must cover). - Absorption into an ongoing move (Case A) resolves faster than absorption against a rolling-over, extended move (Case B). - A small cluster at the extreme of the day is the weaker setup, even when the signal colors look identical.
10. Confirmation stack
A trapped signal is strongest when the auction context agrees:
| Tool | Trapped Seller (bullish) | Trapped Buyer (bearish) |
|---|---|---|
| VolImbalance | ASK cluster (resistance) | BID cluster (support) |
| AbsorptionMap | 🟢 selling absorbed | 🔴 buying absorbed |
| AuctionEngine | Higher Value Acceptance, Continuation, Loc: Above prior value | Lower Value Acceptance, Continuation, Loc: Below prior value |
| VolDelta | rising despite selling pressure | falling despite buying pressure |
If all point the same way, the break is the likely resolution. If they conflict, it is a context signal, not a trade.
Note when reviewing: the AuctionEngine panel always shows the current live state, not the state at the time of a historical bar. To judge the auction context of a past signal, set Auction Context to Historical. Otherwise you read today's state into yesterday's setup.
11. Practical checklist
- Found a cluster? Note the type (ASK = resistance, BID = support).
- Is there a diamond on it? If not → ordinary S/R level, trade it classically (fade it).
- Diamond in the opposite color? → Trapped. Discard the fade idea.
- How big is the trapped cluster?
[5x] 649≫[3x] 280. More trapped size = more fuel. - Where is price in the move? Absorption into an ongoing move beats absorption at an extended extreme.
- AuctionEngine disagrees? → context only, no trade.
- Do not enter on the diamond. Enter on the break. The close beyond
PriceMax + Deviationis the trigger. - Watch the retest from the other side as the better entry.
12. Common mistakes
- "Red line = short." Wrong the moment a green diamond sits on it.
- Entering on the diamond instead of the break. Case B costs you 18 points even though the signal was ultimately right.
- Judging by wick instead of close. A wick through the zone is confirmation that the level holds, not a break.
- Leaving the deviation too wide. You are waiting for the break, and the indicator reports it 21 minutes late, or not at all.
- Trading a trapped signal without auction context. Without backing it is an observation, not a setup.
- Ignoring signal size.
[3x] 280and[5x] 649look the same but are not equally strong.
Code references:
Flow42VolImbalance.cs → ImbalanceType, AskImbalanceColor / BidImbalanceColor,
ValidateClusterAbsorption (break logic), CalculateDeviationPrice.
Flow42AbsorptionMap.cs → BidAbsorbedColor / AskAbsorbedColor (line 1023-1024),
tooltip "Bullish absorption / selling absorbed" vs "Bearish absorption / buying absorbed".
Figures: MNQ 09-26, 2026-07-10, 1-minute, calibrated from the live chart. Figure annotations are deliberately English so that both language versions share the same images.
Flow.42 Analytics